 Save to Pinterest
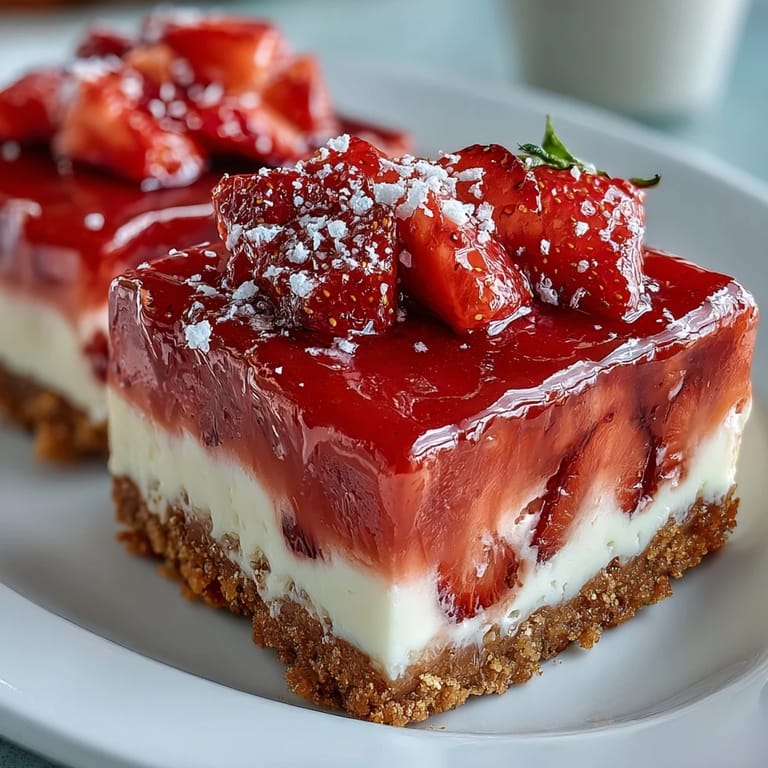
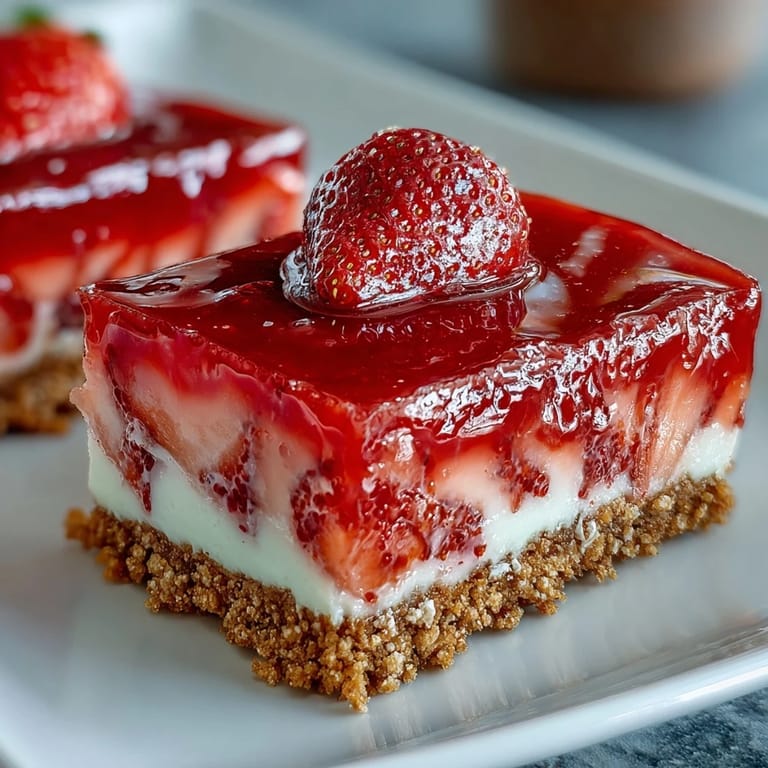
 My neighbor dropped off a basket of strawberries one June morning, more than she could use, and I spent the afternoon wondering what dessert could honor them properly. That's when the idea of strawberry lemonade bars came to me—the kind of thing that tastes like summer in your mouth, with that bright tartness cutting through the sweetness. I'd never made them before, but something about combining fresh berries with lemon juice felt like it belonged together. The shortbread base seemed like the perfect foundation, buttery and sturdy enough to hold that tangy filling without falling apart. By the time my family got home, the whole kitchen smelled like citrus and strawberries, and I knew I'd found something worth making again and again.
The first time I served these at a summer potluck, I watched someone take a bite and immediately smile—that kind of genuine reaction that happens when flavors surprise you in the best way. A friend asked if they were store-bought because they looked so polished, which made me laugh while secretly feeling proud. What started as a way to use up berries had become the kind of dessert people actually remember asking about the next time you see them.
Ingredients
- Unsalted butter (1 cup, softened): Use softened butter for the crust so it creams smoothly with sugar and creates that tender, melt-in-your-mouth texture.
- Granulated sugar (1/2 cup for crust, 1 cup for filling): The sugar in the crust creates structure while the filling sugar dissolves into the custard-like center.
- All-purpose flour (2 cups for crust, 1/3 cup for filling): Keep your flour airy by spooning it into the measuring cup rather than scooping directly from the bag.
- Salt (1/4 tsp for crust, 1/4 tsp for filling): This small amount amplifies the sweetness and brightness without tasting salty itself.
- Fresh strawberries (1 cup, hulled and diced): Choose berries that smell fragrant and feel firm—watery ones will make the filling too thin.
- Large eggs (3): Room temperature eggs whisk more smoothly and incorporate better into the filling, creating a silkier texture.
- Freshly squeezed lemon juice (1/3 cup): This is non-negotiable—bottled lemon juice tastes flat and one-dimensional compared to the real thing.
- Lemon zest (1 tbsp finely grated): Use a microplane grater so you capture just the fragrant yellow part, not the bitter white pith beneath.
- Powdered sugar (for dusting): This optional topping gives the finished bars a pretty, polished look that makes them feel special.
Tired of Takeout? 🥡
Get 10 meals you can make faster than delivery arrives. Seriously.
One email. No spam. Unsubscribe anytime.
Instructions
- Set the stage:
- Preheat your oven to 350°F and line an 8x8-inch pan with parchment paper, letting the edges hang over the sides like handles. This trick means you'll lift the entire baked rectangle out cleanly rather than wrestling with crumbly corners.
- Build your foundation:
- Cream the softened butter and sugar together until it's pale and fluffy—this usually takes about 2 minutes with an electric mixer. Add your flour and salt, stirring just until a soft dough comes together, then press it firmly and evenly into the bottom of your pan.
- Toast the crust:
- Bake for 18 to 20 minutes until the edges are pale golden and it smells warm and buttery. The crust needs this head start so it stays crispy under the filling and doesn't turn soggy.
- Prepare the filling:
- While the crust bakes, puree your strawberries until completely smooth, then push them through a fine sieve if you want to remove the seeds—this step is optional but gives a more elegant texture. In a large bowl, whisk together eggs, sugar, lemon juice, zest, and your strawberry puree until everything is fully combined and bright pink.
- Add structure to the filling:
- Whisk in your flour and salt until there are no lumps—this flour thickens the filling so it sets up properly without becoming rubbery. The batter should be smooth and pourable but with enough body to hold together when baked.
- Combine and bake:
- Pour the strawberry filling over your hot crust as soon as it comes out of the oven. Return to the oven for 20 to 22 minutes, until the center jiggles just slightly when you gently shake the pan—it will continue cooking as it cools.
- Cool with patience:
- Let the bars cool completely on a rack, which usually takes an hour or so, then refrigerate for at least 2 hours. This resting time is essential because it firms up the filling enough to slice cleanly without crumbling.
- Slice and serve:
- Use the parchment overhang to lift the entire rectangle out, then cut into 16 squares using a sharp knife dipped in warm water between cuts. A light dusting of powdered sugar adds a professional finishing touch if you're feeling fancy.
 Save to Pinterest
 There was this unexpected moment when my daughter came home from school, took one bite, and declared these her new favorite dessert—surpassing the chocolate chip cookies I'd been making since she was little. Sometimes a recipe becomes more than just food when it creates a small memory like that.
The Secret to a Crispy Crust
The difference between a shortbread crust that stays crispy and one that turns soggy lies in baking it long enough on its own first. I used to skip this step and pour the filling over a barely-set crust, which meant the bottom absorbed moisture and turned into something closer to cake. Now I give it those full 18 to 20 minutes so the butter sets up and creates a barrier that protects it from the filling. You'll notice the edges start to turn a pale golden color—that's your signal that it's ready.
Strawberry Selection and Preparation
Not all strawberries are created equal when it comes to baking, and I've made this mistake more times than I'd like to admit. The oversized ones from early spring taste beautiful but often contain more water, which can thin out your filling if you're not careful. I've learned to seek out smaller, fragrant berries at the farmer's market or use what you find, knowing that the puree-and-strain method removes excess seeds and juice. The important part is that your berries smell sweet and fruity before you even taste them—that's the best indicator of flavor strength.
Storage, Variations, and Serving Ideas
These bars keep beautifully in the refrigerator for up to four days, which makes them ideal for preparing ahead when you're expecting guests. The cold temperature actually helps them taste brighter and fresher, almost like eating a frozen treat on a warm day. You can also experiment with other berries—raspberries create a deeper, more sophisticated flavor while blueberries give you a subtler sweetness that's equally lovely. My favorite trick is to serve them straight from the refrigerator alongside a cup of strong tea or fresh lemonade, creating a moment that feels a bit more intentional than just grabbing a dessert.
- Try adding a teaspoon of vanilla extract to the filling for warmth and depth.
- A light glaze made from powdered sugar and lemon juice adds elegance if you're serving them at a gathering.
- These bars are naturally vegetarian but not vegan, so they work beautifully for mixed dietary preferences.
 Save to Pinterest
 These bars have become my go-to recipe when I want something that looks impressive without requiring complicated techniques or unusual ingredients. They're the kind of dessert that makes people feel genuinely happy, which is really all any baker can ask for.
Recipe FAQs
- → How do I achieve a crisp shortbread crust?
Use chilled butter and mix the dough just until combined to avoid overworking. Bake until the edges are lightly golden for the best texture.
- → Can I substitute strawberries with other fruits?
Yes, raspberries or blueberries can be used for a different but equally delicious flavor profile.
- → What’s the best way to get a smooth fruit filling?
Puree the diced strawberries thoroughly and strain through a fine sieve to remove seeds for a silky consistency.
- → How long should the bars chill before serving?
Refrigerate the bars for at least 2 hours to allow the filling to set properly and facilitate clean slicing.
- → Is powdered sugar topping necessary?
It’s optional but adds a subtle sweetness and a pretty finish to the bars.