 Save to Pinterest
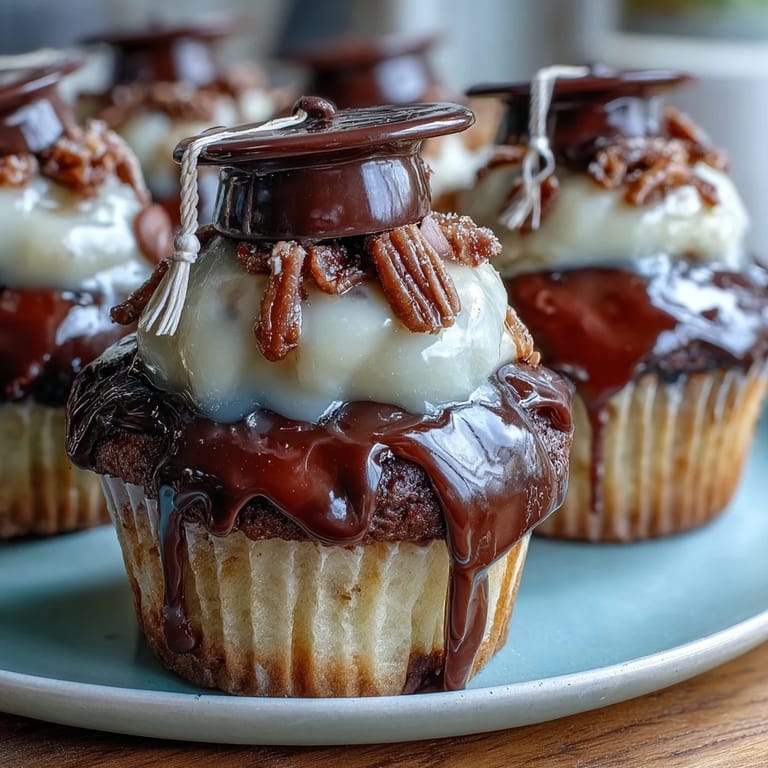
 Last spring, my neighbor knocked on my door with a panicked look—her daughter's graduation party was in three hours and she'd forgotten dessert entirely. I had flour, butter, and eggs on hand, so we threw together these cupcakes while she told me stories about watching her kid grow up. By the time we piped the frosting and stuck those little chocolate graduation caps on top, we were both laughing so hard we could barely see straight. That's when I realized these cupcakes weren't just easy—they were pure joy in edible form.
I made these for my coworker's son's graduation party, and watching the kids' faces light up when they spotted those tiny chocolate mortarboards was unforgettable. One kid asked if they were edible and seemed genuinely shocked when I said yes—he bit right into the tassel licorice without hesitation. Sometimes the best part of cooking isn't the taste; it's that split second when someone realizes they can eat the decoration too.
Ingredients
- All-purpose flour: The foundation of a tender crumb; sifting it isn't strictly necessary, but it does make the batter a bit more refined if you have the extra minute.
- Granulated sugar: This creams beautifully with butter and creates that light, fluffy texture that makes these cupcakes feel homemade rather than box-mix basic.
- Unsalted butter: Using unsalted lets you control the salt level and ensures the frosting tastes fresh, not greasy or over-salted.
- Large eggs: Room temperature eggs blend more smoothly into the batter, so pull yours out 20 minutes before you start mixing if you remember.
- Whole milk: A small amount keeps the batter moist without making the crumb heavy or dense.
- Baking powder: Make sure yours isn't expired; old baking powder won't give you that gentle rise.
- Pure vanilla extract: Don't skimp here—it's the invisible backbone of flavor that makes people say, 'Wow, these actually taste homemade.'
- Powdered sugar: Sifting it removes lumps and helps your frosting stay silky smooth and spreadable.
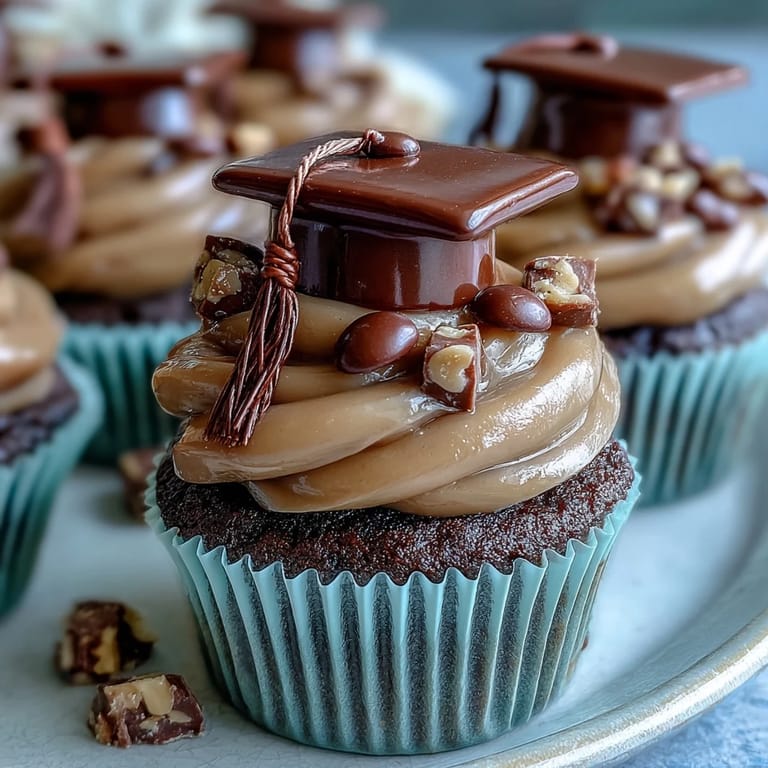
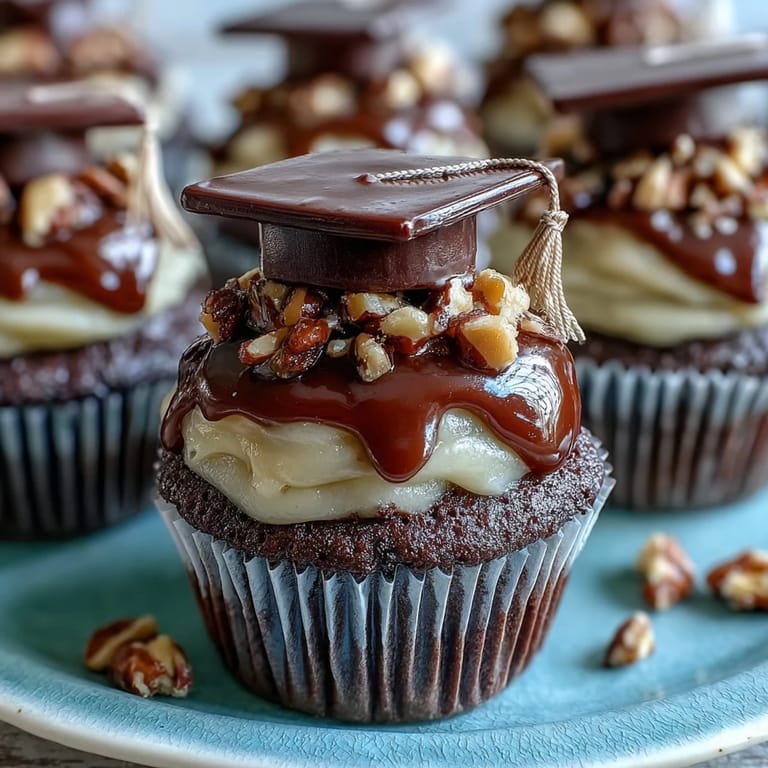
- Mini peanut butter cups: These are the secret to the whole topper design; their flat bottom makes them stable when you flip them upside-down.
- Chocolate square candies: Ghirardelli or similar brands work perfectly as the mortarboard base because they're sturdy and flat.
- String licorice or sour candy strips: These become the tassel and add a playful touch; the flexibility matters so they don't snap when you bend them.
- Mini M&Ms or candy pearls: The tiny detail that makes the cap look complete and adds a pop of color.
Tired of Takeout? 🥡
Get 10 meals you can make faster than delivery arrives. Seriously.
One email. No spam. Unsubscribe anytime.
Instructions
- Preheat and prepare:
- Heat your oven to 350°F and line a 12-cup muffin tin with paper liners; this is the only mise en place you really need to do ahead.
- Cream the butter and sugar:
- Beat them together for about two minutes until the mixture looks pale and fluffy—this is where the magic happens, creating tiny air bubbles that make the cupcakes light. You'll know it's ready when you can't feel the grittiness of sugar between your fingers.
- Add eggs and vanilla:
- Drop in one egg at a time, beating well after each addition so everything stays emulsified and smooth. Stir in the vanilla and you've just created the flavor base.
- Mix the dry ingredients separately:
- In another bowl, whisk together the flour, baking powder, and salt; this distributes the leavening evenly so every cupcake rises at the same rate.
- Combine wet and dry in stages:
- Add half the flour mixture to the butter mixture, stir gently, pour in the milk, then add the remaining flour and mix until just combined—overmixing toughens the crumb, so stop as soon as you don't see streaks of white. The batter should look soft and slightly thick.
- Fill and bake:
- Divide the batter evenly among the liners (an ice cream scoop works beautifully for this) and slide the tin into the oven for 18 to 20 minutes. A toothpick inserted into the center should come out clean or with just a few moist crumbs clinging to it.
- Cool completely:
- Let the cupcakes sit in the tin for five minutes, then turn them out onto a wire rack; they must be completely cool before frosting or the buttercream will melt and slide off.
- Make the frosting:
- Beat the softened butter until it's smooth and pale, then gradually add the powdered sugar in small batches while beating, so you don't end up with a cloud of sugar everywhere. Add the milk, vanilla, and salt and beat until the frosting is light and fluffy, about two more minutes.
- Frost the cupcakes:
- Use a piping bag fitted with a round or swirl tip, or simply swirl the frosting on with the back of a spoon—both look beautiful and taste the same.
- Create the graduation cap toppers:
- Lay a chocolate square flat-side up, dab a tiny bit of melted chocolate or frosting in the center, and press a mini peanut butter cup upside-down onto it so it sticks like glue. Attach a piece of licorice on one side as the tassel and a mini M&M as the button, using a dab of chocolate to secure each piece.
- Assemble and serve:
- Once the toppers are set (give them 10 minutes), crown each frosted cupcake with one; they'll sit proudly and add that unmistakable celebration touch.
 Save to Pinterest
 There's something magical about watching someone bite into a cupcake and suddenly realize the decoration itself tastes good. A friend's teenage daughter told me these were 'the only graduation cupcakes that actually felt like a celebration and not just a chore someone had to check off.' That's the moment I knew these weren't just easy to make—they were genuinely special.
Storage and Make-Ahead Tips
These cupcakes keep beautifully in an airtight container at room temperature for up to two days, which means you can bake them the night before a party and frost them in the morning. If you're assembling the graduation caps ahead of time, store them separately in a cool, dry place so the licorice doesn't get sticky or the chocolate doesn't soften. The unfrosted, unfilled cupcakes can even be wrapped individually and frozen for up to a month, making these perfect for graduation season when you might need multiple batches.
Customizing for Your Celebration
Food coloring is your friend here—a few drops mixed into the frosting can match your school colors, turning these into personalized decorations rather than generic cupcakes. You can also swap the frosting color while keeping the cupcake batter plain, so you get a surprise layer when someone cuts in. If you want to get fancy, use edible gold dust on the chocolate squares or swap the licorice for thin ribbons in school colors.
Handling Allergies and Dietary Needs
For nut-free celebrations, skip the peanut butter cups entirely and use chocolate squares or candy-coated chocolates to create the cap structure—the visual effect is just as charming. Always double-check candy labels, as many brands process nuts in their facilities even if the product itself is nut-free. These cupcakes are vegetarian by nature, and you can easily make them dairy-free by swapping butter for a plant-based alternative and using non-dairy milk, though you'll want to adjust the frosting recipe slightly.
- Read every candy label carefully, even brands you've trusted before, since formulations sometimes change.
- Let guests with allergies know exactly what's in the toppers so they can decide whether to eat just the cupcake or skip it entirely.
- Keep a small note card next to the cupcakes listing the main allergens—it's considerate and saves people the embarrassment of asking.
 Save to Pinterest
 These cupcakes have become my go-to celebration dessert because they're genuinely foolproof and they make people smile. They taste like homemade kindness topped with a little edible joke that says, 'Yes, this is worth celebrating.'
Recipe FAQs
- → What ingredients create the cupcake base?
The cupcakes combine all-purpose flour, granulated sugar, softened butter, eggs, whole milk, baking powder, salt, and vanilla extract for a moist texture and rich vanilla flavor.
- → How is the buttercream frosting made?
Buttercream frosting is made by beating softened butter, powdered sugar, whole milk, vanilla extract, and a pinch of salt until smooth and fluffy.
- → What materials are used for the cap toppers?
The toppers feature mini peanut butter cups or chocolate squares, chocolate candy squares, string licorice or sour candy strips for tassels, and mini M&Ms or candy pearls as decorative buttons.
- → Can these cupcakes accommodate nut allergies?
Yes, replacing peanut butter cups with nut-free chocolate squares provides a safe alternative for those with nut allergies.
- → How should the cupcakes be stored after preparation?
Store cupcakes in an airtight container at room temperature for up to two days to maintain freshness and texture.
- → Is food coloring recommended for the frosting?
Food coloring can be added to the buttercream to match school or event colors, enhancing the festive appearance.